From Enscape to Corona: Unlocking Photorealism in Your Archviz Workflow
POSTED 15th OF Jul, 2025, Posted by Summer
POSTED 15th OF Jul, 2025, Posted by Summer
Architectural visualization has come a long way, and artists today demand not just speed but realism. If you've been using Enscape 3D for fast conceptual renders but are now looking to elevate your final outputs with photorealistic quality, this workflow might just be the missing link in your pipeline.
In this blog, we’ll walk through a practical method to bridge Enscape software with Corona Renderer, using 3ds Max as the connecting platform. Based on the latest tutorial released by Corona Archviz, this process takes your Enscape scenes and transforms them into stunningly realistic visualizations without rebuilding everything from scratch.
Let’s break it down.
Enscape is known for its real-time rendering capabilities. It's fast, intuitive, and built directly into platforms like Revit, SketchUp, and Rhino. But while it's excellent for design development and quick visual feedback, you might reach a ceiling when aiming for hyperrealistic final renders.
That's where Corona Renderer shines. It's built for beauty, simplicity, and realism, making it a favorite among visualization artists working in 3ds Max. So what if you could combine the speed of Enscape rendering with the photorealism of Corona? Spoiler: you can.
The magic starts with exporting your Enscape scene. Inside Enscape software, use the .vrscene export function. This format retains your geometry, materials, lighting, and camera data, making it ideal for transitioning into 3ds Max.
This step is quick and allows you to preserve much of the visual intent from your Enscape rendering without redoing everything manually.
Once you've got your .vrscene file, fire up 3ds Max. Corona Archviz's tutorial walks through the exact import process, ensuring the file loads correctly.
Here’s what to keep in mind:
If you’ve never done this before, the tutorial makes it very approachable even if you're more familiar with Enscape than 3ds Max.
Your Enscape camera settings will carry over, but you’ll likely need to refine them for Corona. The tutorial shows how to switch to the imported camera and tweak framing and field of view inside 3ds Max.
This step is crucial for maintaining the design intent from your original Enscape 3D scene.
Now comes the fun part: lighting and render settings. Corona gives you robust control over exposure, white balance, tone mapping, and more. In the video, you’ll learn how to:
If you’ve used Enscape lighting before, you’ll appreciate how much more control Corona offers at this stage.
Let’s be honest, materials from Enscape are decent, but they often need a boost when aiming for photorealism. Corona Archviz shows you how to:
This stage is where your project transforms from a good render into a realistic architectural visualization.
Whether you’re an architect, designer, or visualization specialist, blending Enscape rendering speed with Corona’s realism can help you deliver stunning results without compromising efficiency.
This Enscape to Corona workflow is perfect for:
The full video tutorial is packed with practical tips and clear instructions, making it a must-watch if you're serious about leveling up your rendering game.
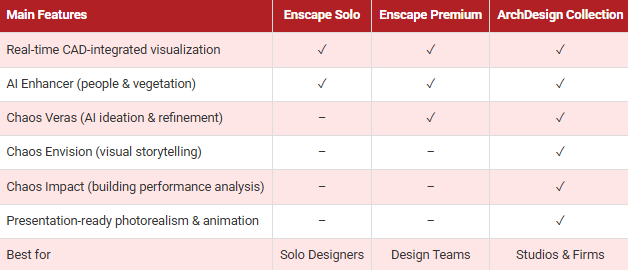
This complete suite featuring Enscape, Veras, Envision, and Impact delivers real-time storytelling, scene animation, and early-stage building performance analysis. Scalable for studios and multi-role teams, it offers the best-value package for end-to-end design visualization. Available in named and floating licenses, with annual and 3-year options.
This add-on brings Chaos Veras for AI-powered concept generation, enabling selective AI rendering to refine key design elements faster. It enhances workflows with deeper visualization features and integrates seamlessly with major CAD platforms and formats. Available in named and floating licenses, with annual and 3-year options.

This real-time 3D visualization tool integrates directly into CAD software, making it ideal for solo architects and interior designers. It features an AI Enhancer for clearer people and vegetation, supports quick client feedback, and streamlines early-stage design iteration. Available in named licenses, with annual and 3-year options.

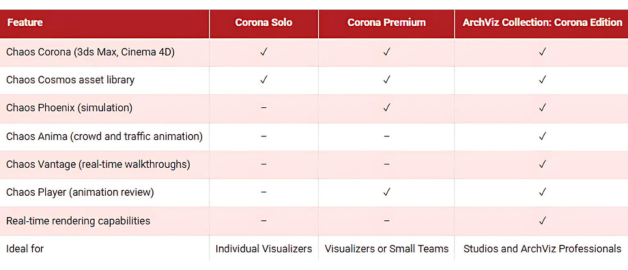
Includes all Corona Premium features plus Chaos Vantage and Anima for real-time walkthroughs, animated crowds, and high-performance rendering—ideal for studios needing full visualization control, seamless workflow, and centralized team licensing. Available in named and floating licenses, with annual and 3-year options.
Includes all features of Corona Solo, plus Chaos Phoenix for realistic fire, smoke, liquid, and ocean simulations in 3ds Max or Cinema 4D. With Chaos Player for fast animation review, it's ideal for teams needing high-quality visuals, efficient iteration, and powerful rendering for cinematic, industrial, or motion design projects. Available in floating licenses, with annual and 3-year options.

Chaos Corona delivers fast, intuitive photorealistic rendering for 3ds Max and Cinema 4D. With built-in post-processing, global illumination, and access to 10,000+ Cosmos assets, it streamlines workflows without needing high-end hardware—ideal for architecture, interiors, and product visualization. Available in named licenses, with annual and 3-year options.
